
Python challenge 5 - How do computers modify images?
Photo editing software has been developed over decades, and as computers get more powerful the ability of computers to detect objects and process the results, often in real time, has increased their capabilities significantly.
How do computers modify images?
The field of Computer Vision is wide ranging and increasing in importance. In this tutorial we consider only static images, as static images form the basis of more challenging video editing.
This final challenge is a little more creative and will consider programmatic ways of image editing. All parts of the challenge can be done in far less than a page of code using appropriate packages.
Target:
Write one page of Python that will:
- Load an image and then display the image.
- Plot the negative of your image.
- Plot a histogram of the RGB values within your image.
Extensions:
- Choose a small feature in your image and remove it using in-painting.
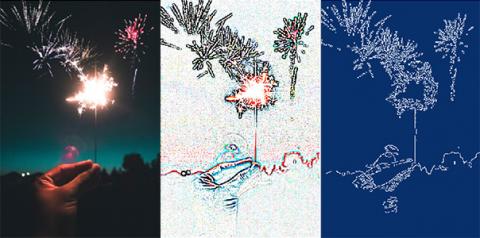
- Run edge detection on your image using the Canny Edge detector.
- Smooth the image using a Gaussian filter.
Try to get as far as you can on your own before viewing the hints or the solution
-
Hints for Python Challenge 5
Packages
- The only package used (on top of numpy and matplotlib) is the OpenCV package. This has a Python wrapper called cv2. This wrapper is a set of scripts that interfaces between Python and OpenCV commands, which is written in a ‘lower level’ (faster) language.
- In fact, OpenCV is a Computer Vision package that can be used for a wide range of tasks beyond the simple image analysis considered here.
Hints and Notes
- The methods within OpenCV are quite comprehensive. Use these liberally to achieve what you are looking to do.
- These methods often have parameters that need to be tweaked to get the desired result. Experiment with these parameters and see what outputs you can create!
-
Solution for Python Challenge 5
# ===== Challenge 5 - How do computers modify images?

import numpy as np
import matplotlib.pyplot as plt
import cv2,sys,os
from matplotlib import cm

# 1. Load and show an image.
a_scale = 0.1
working_dir = os.path.dirname(sys.argv[0])
# Set name of image in or relative to the current directory
image_name = 'bright-canada-day-celebrate-1697902.jpg'
image = cv2.imread(os.path.join(working_dir, image_name))
sm_image = cv2.resize(image, (0,0), fx=a_scale, fy=a_scale, interpolation=cv2.INTER_AREA)
cv2.imshow("Image", sm_image)
cv2.waitKey(0)
cv2.destroyAllWindows()

# 2. Plot the negative of the image.
im_negative = 255 - sm_image
cv2.imshow("Image Negative", im_negative)
cv2.waitKey(0)
cv2.destroyAllWindows()

# 3. Plot a histogram of the colours of the image.
color = ('b','g','r')
for i,col in enumerate(color):
    histr = cv2.calcHist([image], [i], None, [256], [0,256])
    plt.step(np.arange(len(histr)), histr, color = col)

plt.xlim([-1,256])
plt.show()

# E1. Remove a feature from your image.
sm_image_mask = np.zeros(sm_image.shape[0:2], dtype='uint8')
sm_image_mask[240:355,200:210] = 1 # The stick
sm_image_mask[30:150,240:346] = 1 # Fireworks R
sm_image_mask[100:250,280:300] = 1 # Fireworks R

im_ip = cv2.inpaint(sm_image, sm_image_mask, 5, cv2.INPAINT_NS)
cv2.imshow("Inpainting the image", im_ip)
cv2.waitKey(0)
cv2.destroyAllWindows()

# E2. Plot the Laplacian of the image.
lapl_im = cv2.Laplacian(sm_image, cv2.CV_8U, ksize=5)
cv2.imshow("Image Laplacian", lapl_im)
cv2.waitKey(0)
cv2.destroyAllWindows()

# E3: Find edges using Canny edge detector
edge_im = cv2.Canny(sm_image, 35, 100)
plt.imshow(edge_im, cmap=cm.Blues_r)
plt.axis('off')
plt.show()